-cropped.png)
Candidate Selection Application Instructions
The following instructions for the Candidate Selection application are designed to step you through establishing an account for your organization, setup a candidate pool, begin inputting candidate data, edit candidate information, create sample groups, manage users and account information, and report issues or provide feedback. This document will be updated as pertinent feedback is received and integrated into the system. If you have any questions or feedback, please contact us through the “Report Issue” feature within the application or email us at: support@hawkeyeioservices.com.
New Account:

Click on “Need an Account?”
-
Complete the information.
-
Click on “Continue”.
-
If you already have an account, then click on “Already registered?”.
-

-
Click on “Subscribe Now”.
-
Click on “Logout” if you are not ready to subscribe.
-
-
Choose a plan. You have the option to pay monthly or annually. You may cancel at any time.
-
Input any applicable promotional code.
-
-
Complete the “Pay with card” form and click on “Subscribe”.
-
Even with a promotional code, the “Pay with card” form will need to be completed.
-
-
After clicking on “Subscribe”, the login screen will appear.
Existing Account:
-
Input the applicable email and password.
-
Click on “Forgot your password?” if you need to reset your password. An email to reset your password will be sent to the email address you input.
-

Main Dashboard Screen:

-
From the main dashboard screen, the user is able to:
-
View active and archived Candidate Pools.
-
Create new Candidate Pools.
-
Navigate to Manage Users screen.
-
Navigate to Account Information screen.
-
Report an issue with the system.
-
View the Terms of Use.
-
View the Privacy Policy.
-
Logout of the system.
-
Creating a New Candidate Pool:

-
Click on “+ New Candidate Pool”.
-
Input a name for the Candidate Pool.
-
It is recommended that you create a unique name for each newly created Candidate Pool.
-
Click on “Create” to save the Candidate Pool or “Cancel” to cancel without saving the Candidate Pool.
-
The newly created Candidate Pool screen will appear.
Adding information to Candidate Pool:

-
You can access any existing Candidate Pool from the main dashboard screen by clicking on the name of the Candidate Pool you want to review.
-
From the Candidate Pools screen, you can:
-
Navigate back to the main dashboard screen by clicking on the “Candidate Pools” icon on the lefthand menu or click on “Candidate Pools” at the top of the screen above the name of the Candidate Pool you are working on.
-

-
Edit menu: Edit the existing Candidate Pool:
-
Rename the current Candidate Pool.
-
Place the current Candidate Pool into “Archive” status. Archiving the Candidate Pool is performed when you are done with the Candidate Pool and want to remove it from the list of working Candidate Pools on the main dashboard screen.
-
Note: Candidate Pools can only be archived. If you want to delete a Candidate Pool you must submit a “Report Issue” ticket or contact Customer Support.
-
Column information can be sorted, filtered, hidden, and pinned by clicking on the desired column header name or three dots next to the desired column header name.
-

-
Import/Export menu: Import/Export Candidate lists:
-
Importing a candidate list is done using the provided .CSV file. Follow the instructions provided for importing candidate lists.
-
Exported candidate lists are in .CSV format.
-

-
New menu: Inputting a new candidate into the current Candidate Pool:
-
Click on “New Candidate” and complete the “Basic Information” form.
-
Click “Cancel” to cancel task or “Add Candidate” to insert candidate into the Candidate Pool.
-
Create a new Sample Group:
-
-
New menu: Creating a New Sample Group:
-
A Sample Group is the selected list of candidates taken from the current Candidate Pool.
-
New Sample Groups can be created as long as candidates exist within the current Candidate Pool.
-
Sample Groups can be viewed in the “Sample Groups” list by clicking on the name of the sample group you want to review.
-
Created sample group information can be exported to a .CSV file.
-
-
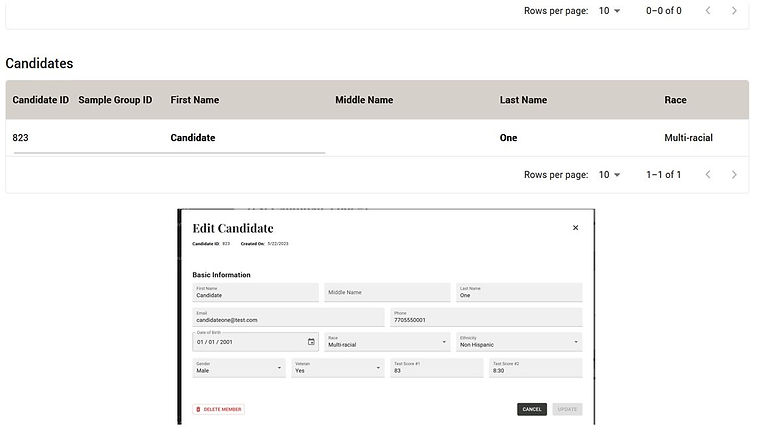
Update existing candidate information in Candidate Pool:
-
Click on the candidate’s name from the list of “Candidates”.
-
Update the appropriate candidate information.
-
Click “Cancel” to cancel the update or “Update” to save the changes.
-
Click “Delete” if you want to delete the candidate from the “Candidates” list.
-
Manage Users (Team Owner):

-
The person who performs the initial account setup will be the “Team Owner”. They can:
-
Add Team Members. These are the people who will have access to create/edit Candidate Pools, add/edit candidates, and create new Sample Groups.
-
Delete team members from the Team Member list.
-
-
Added Team Members can:
-
Create/edit Candidate Pools, add/edit candidates, and create new Sample Groups.
-
Update their personal account information, including resetting password.
-
Account Information:

-
Organization and personal information can be viewed.
-
Team Owners and Team Members can update personal information, including resetting their password.
-
Team Owners only can manage subscriptions and view invoice history.
Report Issue:

-
Complete this form if you experience a system issue, want to delete a Candidate Pool, or have questions about the system.
Import Template for Candidates:

-
The latest Import Template for adding/editing candidates can be downloaded from the application using the Import function.

-
First Name, Last Name, Date of Birth (DOB), Ethnicity, Race, and Sex are required fields for the import feature to work properly.
-
Phone number and email address must be unique among candidates. Note, if you change an existing phone number and/or email address of a candidate and perform the import function the system will add a new candidate instead of updating the existing candidate. It is better to leave the field(s) blank and update later when the information has been confirmed.
-
DOB must be in the format of dd-mm-yyyy.
-
When using the import template to upload candidate information to the Candidate Pool, it is important to follow the format in this example and use the terms shown when designating Ethnicity, Race, and Sex.
-
Ethnicity:
-
non_hispanic
-
hispanic_latino
-
-
Race:
-
white
-
indo_european
-
black_african_american
-
american_indian_alaska_native
-
asian
-
native_hawaiian_other_pacific_islander
-
multi-racial
-
unknown
-
-
Sex:
-
male
-
female
-
intersex
-
unknown
-
-
Veteran:
-
Default value (blank) is "No"
-
"1" is "Yes"
-
"0" is "No"
-
-
Test Score 1 and Test Score 2
-
Can be left blank
-
Can be any combination of letters, numbers, and/or symbols (i.e., 85, 85%, 802, 8:02, etc.)
-
-